Thursday, December 31, 2015

Holiday Happenings

Christmas time is a fun time to "craft" and with my passion for tangling I had to put the two together ... a little research and I decided to try my hand at ornaments.

I started off with basic frosted glass ornaments available at most hobby and craft stores -  i chose clear frosted, white, silver, gold, and black (or a very dark gray).  A tip I read about (and I regret I can't remember where, but I think it was on tanglepatterns.com) was to wear a white cotton glove on the hand that will be holding the ornament.  At first I thought this was odd, but the advice pointed out it would keep the oils in your skin off the ornament and nor mar the frosting (it worked!) ... It also gives you a better grip on the ornament.

First, remove the little hanger loop and cap, also making it easier to hold.  I used Identapens on the lighter colored ornaments and White Gelly Roll on the dark ones.  It is a little easier to use patterns / a design that do not need to be exact, but if you want an even design, start with very tiny dots around the top to "divide" the ornament evenly.  Monograms also make an attractive ornament, although it can be tricky to center the letter and keep it straight on a curved surface.  A monogramed ornament make a special gift for family and friends.

Here are a few so far ....


These are (were) all going to be gifts, but hubby keeps wanting to keep each new one I make!

OOPS!  Somehow I forgot to click "Publish!"


Thursday, November 26, 2015

Fall 2015

The fall went quickly and the holidays are upon us!  They seen to be running together craft wise ...

First, pumpkins and more pumpkins!  I actually did these before Halloween, and they stayed displayed through Thanksgiving ... The white, black, and silver will actually be on the mantle up all year, except from tomorrow through Christmas, while the stockings are hung ...


These are all "craft" pumpkins; the "black" ink is Identapen, the white is Gelly Roll.  The silver and beige pumpkins are not tangled, just extras ... their is always next year!

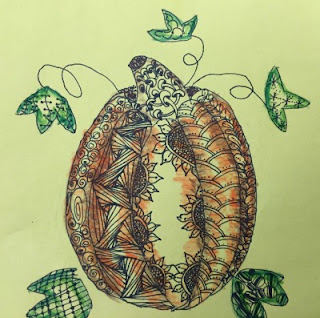
Since it was pumpkin season, I had to take the idea to the classroom, and with a directed draw lesson and a few patterns my fourth graders (ages 9-10) produced these ~ they took them home for Thanksgiving.  They selected where to put the patterns, and added a little color for shading.  This is only the second tangle project the students have done.


Happy Thanksgiving!

Sunday, September 13, 2015

Recovery Happens ...

In 95 degree weather, with about 80 percent humidity and the sun bearing down on a not-so-typical HOT San Diego day, my CZT, Janet Masey, her Step-Mom and daughter, and I teamed up to demonstrate "Tangling" at a community event and resource fair for people getting their lives back on track due to a variety of issues troubling them.  It was good to see there are many resources out there ~ one being Zentangling Classes.  Janet did all the work, I just drew larger examples of various patterns in the background.  She was able to make several good contacts to grow her business.  The interactive demonstration was well received and participants were typically amazed at how easy tangling is ... a few pictures from the day...


I was just happy to get back to tangling after a couple of weeks hiatus. 


Monday, September 7, 2015

It's Been A While ...

... a little over a month actually!  With getting the classroom ready; welcoming 33 new fourth graders; all the planning, prep, and assessments; Back To School Night Presentation for parents (with 32 students represented); visitor from Moscow; Grandson's 4th Birthday; and a granddaughter striking out on her own ~ it has been a busy month!  I do have a few items to share.

Yes, this is a pole dancer, but done for fitness, not the "traditional" pole dancing you might be thinking of ...

This was created from a photograph of, and for, our friend from Moscow.  She is actually a friend of my older son's, but I have adopted her! ... She is in training for a performance with a circus, the equivalent of Cirque du Soleil here in the States.  Lana works out on "the pole" almost daily.  She has incredible strength and is very flexible ... ah, to be that young again!


This next piece was inspired by Project Semicolon.  It is described on the Internet and social media as a "global, faith-based, non-profit movement dedicated to presenting hope and love to those who are struggling ..."  It exists to "encourage, love, and inspire." There is a dedication of this movement to developing a much needed awareness of mental illnesses, so I made it the focus of this tangle.


My oldest Granddaughter is a strong young lady.  She is on the thresh-hold of striking out on her own.  Making the decision to leave home and family was hard, yet she bravely made that decision and is moving out of state - tomorrow.  Since she needed a little encouragement, inspiration, and a lot of love, I gave this piece to her... and said good bye between tears.  At least I know I will see her in a few months ~ and it is really no different than her going away to college - which she will start in January.

As planned, I have started teaching my fourth graders tangle patterns - we have covered 16 and they love it!  Several request we "tangle" on a daily basis ... this coming week we will be starting a project, that I will share in a future post...

Another on-going WIA is a 16-page journal I'm working on.  I signed up for an on-line art journaling workshop with Valerie Sjodin, exactly one week before I reported back to school ... Probably not the brightest thing I have ever done, however I am learning a lot and enjoying working on this project.  In another future post I will feature a page or two .... and the semicolon is featured in that project as well.

I am also excited to have been invited by my CZT Teacher, Janet Masey, to help her at an Exhibition Fair demonstrating tangling next weekend ... I will post how it goes - until then, tangle on - I will be!

Monday, August 3, 2015

The Wedding Gift ... and A Card

Sounds like the title of a movie ...

I took a little hiatus from the challenges to begin a few ZIA projects I needed to finish before the Back-To-School rush ... although I'm already having sleepless nights!

I was excited about this piece, and nervous at the same time!  I wanted to give a colleague a special remembrance of her special day - but would she (and her husband) like it????  (And I am still fairly new to tangling!)  I started with the wedding "colors" - gray and yellow, and of course white.  I chose a dark gray card stock (cut to 8 X 10), white gel pen, and white charcoal pencil (After several "tests" on a scrap piece of the gray paper, none of my yellow pens, markers, pencils, showed up!)

The invitation, and some decorations, had their initials - remembrance #2 - include their initials.  #3 - include the date of their wedding ...

Searching through clipart I found (I think) the perfect design - a heart created with intertwining ribbons ...


I drew the design on paper first, then transferred to the card stock and traced the lines with white gel pen.
I began with the letters, as I had a good idea what patterns I wanted to use and how to apply them - making the L (the bride's initial) a little more feminine than the A (the groom's).

I let the piece rest for a while - I wanted the ribbons to look twisted with both sides having different, complimentary patterns - I needed to think about this ...  I figured out the ribbons, added "dangles" to balance it; shaded with charcoal pencil; and then found (what I think) is the perfect frame (even though it doesn't have yellow in it!)  Hope they like it!  


Let's not forget a card!  I really like the "stacked pattern" look ~ and what better thing to put on the front of the card than the happy couple's names ... Congratulations Lindsey and Andy!!


A Request ... Celtic Knots

It can be dicey - you do something for one colleague, and another "wants one too".  I was actually flattered!  

One of my grade level partners (who had done a ton for me and our classrooms this summer) and her husband have Irish roots, and she requested a Celtic Knot.  So, a little research, and I found a wonderful set (21!) of videos on You Tube by David Nicholls that really made it look so easy!  (And it really wasn't too hard once you got the hang of his little tricks.)  
Due to the need for precision, I did use a ruler to lay down the initial grid lines.  The rest is freehand.

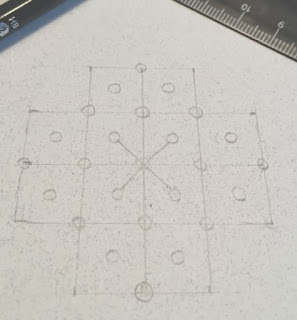
Pairs of alternating parallel lines are lightly sketched in (see video link for details).

The edges are sketched in depending on the pattern used - this one is Celtic Hearts (video 5)

Sticking with the whole name, and stacked look, I began ... Another 8X10, pale green paper, Micron Pens (black and green 02, 05, 08), Derwent Watercolor Pencils, white Gelly Roll for one tiny spot, my favorite - embellishments that are organic garden inspired (Zinger, Phystel, and four little Bijous to represent their family), a dangling heart to match the Celtic Hearts, and the "shamrocks" are mine.  I wanted a fun, whimsical look, but not "silly"... 
The
The letters were sketched in, again for uniformity.

Next, I "inked" everything, and added color ...
Finally, the shading and shadows, plus four Bijous, complete the piece.  Here you go Jenn ~


Seven weeks of "pinning" and I have about 1,000 tangling pins on my board ... and growing!

Wednesday, July 22, 2015

Rain ...


Four inches in 24 hours, with three of them all on Sunday in some parts of the area ... made for a wet weekend and a lot of tangle time!!

First, Suzy Mosh's two Challenges - Tangle Me 3 focused on the pattern,  Boomrang.
This is my attempt at trying to make a boomerang look like a "Dew Drop" - I used the same techniques on the large, center.  The original pattern is in the lower left; the variation on the right uses Printemps in the top designs; the variation across the top "lines" the background.  I only shaded the "dew drop boomerang" so it would stand out.


That's New To Me Week 29 focused on D and the artist, Sandy Hunter of Tangle Bucket.
The patterns I used on this tile tells the story of the weekend!  (Which gave me an idea for this school year - students taking one of their writing assignments or part of a novel or poem, and "tell" the story through a tangled piece ... hummm.)  The patterns from bottom to top - in the middle is Dust Bunny (because they are always hiding); Drip-Drop - because it was raining - HARD; Eureka by Sandy - it represents the winds that came along with the rain; and at the top DL Sunray - because we were all waiting for the sun to appear.  It loos black, but is actually on very dark blue paper (representing the stormy sky).  Shading with the white charcoal pencil I think I captured the "fuzz" on the Dust Bunny" and the glow of the sun well.  I like the final result ... 


Monday, the rain was still around ... so I turned to Joey's Monotangle - G - Gridy.  Since it was still cloudy and drippy, I chose some bright colors for the day.  I like this pattern as it has a lot of dimension.  I added a "dew drop" but don't think it shows up as well as on other patterns... I do like the color combination and background varieties ...


Tuesday is "Good News Day" when Adele posts the String Thing Challenge #102.  This week is her father's birthday and the concentration is on Frost Flower, Sez, and Graancirkel.  I turned the string sideways and purposely left part of the string empty, but added a Frost Flower in the corner and dropped a few Sezs in the white area.  A different technique that I've seen on other tiles, especially when there is a larger white space, is to shade the outline string to shadow the area of the pattern, so I tried that ~ While I like all the patterns and shading, overall this tile is not my favorite...

Friday, July 17, 2015

Developing A Style

My first piece (a 3D pumpkin - see First Inspiration post ) was done in October 2014... I didn't really tangle anything else until April 2015, when I bought a sketchbook and some pens on a whim as I remembered how much I enjoyed completing the pumpkin...  After playing, I felt like I was missing something and decided I needed a few formal lessons, searched and found a CZT, and began classes the end of May, and was HOOKED!  So I have been tangling consistently about two months...

Reflecting on my learning, I realize I am beginning to develop a "style".  For instance, as long as I've been doing any kind of craft/needle work, I've always had a "signature" - my initials with slightly curved lines and overlapping.  Then several weeks ago I started signing the date a specific way - like a fraction with the month as the numerator and the year as the denominator.  I saw someone else had written the date this way and adopted it.  I don't always "sign" in the lower right corner either...  Now, it is what I call the outline string - the line that borders the tile.  Sometimes I use a line, sometimes not, but lately they have the style of a "scroll" ...


Adding to my "style" are some the various techniques I've recently explored that I'm enjoying incorporating (and hope to perfect as I continue learning).

I've had several ask, "How do you do that?!"  I guess the steps one takes to start, and complete, a tile is part of a "style" as well.  
  • Some start with a "string" 
  • Some start at one spot and work out from there
  • Some methodically fill in one section, then next to it, etc., some are more scattered in placing the patterns
  • Some go all the way to the edge, some leave about a 1/4" margin
  • Some ink the lines of the strings, some don't
I guess I am a little from column A, a little from column B ... it just depends on how I feel at the time - I've used all of the above!  There ARE no rules, but I decided to take some photos in stages of a tile to show how one MIGHT progress...

#1 - beginning of a repeated pattern stack
#2 - filling in around the stack
#3 - adding a pattern (Keeko) to the pattern - noter the "stack" has another block added to the height
#4 - the beginning of next pattern (Gnarly) added
#5 - Gnarly added to base of stack; beginning of 3rd pattern, Xplode
#6 - Xplode complete


Now it is time for the finishing touches - filling in areas to balance the tile (generally about 1/3 of the tile is "dark"); and shading to add depth ...


#7 - just part of Gnarley is "blackened"
#8 - shading is added with graphite - note the shadows on Xplode - another new technique tried with this tile ...

And in less than an hour ~ Diane and Carolein's Weekly Alphabet Challenge #15 - X-G-K


Another piece I'm working on - When is enough, enough?  It's OK to leave some white space:  where and how much? ... Not every tile needs to be completely tangled ... This is a personal choice and a balance.  I think it will depend on the patterns and "needs" of the piece ..... and artist!